Sunday, September 23, 2012

Paleo Beef and Lamb Meatballs with goat cheese

My hubby is Italian, meaning that before we went paleo, he LOVED eating a big bowl of pasta with meat sauce, lasagna, ravioli, or any other form of pasta.  I loved it too, but we made a choice to change our eating habits.  One of the good things, though, is that meatballs are still a delicious paleo treat!  I just decided to get a bit creative.  Instead of serving the meatballs over spaghetti squash (which is definitely a yummy alternative), I served these over a bed of sauteed spinach.  I also made a cream sauce rather than a marinara sauce.  My little baby is still growing and needs the grass fed, full fat dairy, so I added a bit with the goat cheese and the cream sauce.  To make these "true paleo," just make a different sauce and don't add in the goat cheese.

Paleo Beef and Lamb Meatballs
 with Goat Cheese


* 1 lb ground beef
* 1 lb ground lamb
* 1 cup minced onions
* 2 egg whites
* 3 tbs minced garlic
* 1 tbs parsley flakes
* 1 tsp salt
* 1 tsp pepper
* 1 tbs garlic powder
* 1 tbs onion powder
* 8 oz goat cheese (optional)

For the sauce
* 1 pint heavy cream
* 1 tsp salt
* 1 tsp pepper
* 1 tbs garlic powder
* 1/2 cup parmesan cheese (grated)


First, I mixed pretty much everything up in a big glass bowl.  I mixed the ground beef, lamb (I like the taste of both mixed together, but you can certainly change it up with pork or just using all lamb or all beef... whatever you like). I also added in the onions, garlic, spices, and egg whites.  You could also use a whole egg, but I had egg whites that I needed to use. I just used my hands and mixed everything up.  Make sure not to work the mixture too much because the last thing you want is the meat turning rubbery and tough.


Most people add some sort of breadcrumb, white bread soaked in milk, or some other jazz... I've made several batches of meatballs without them and really haven't missed them.  These are moist enough without having to add bread to make them soft.


Once everything was thoroughly mixed, I took the goat cheese and put it into a small dish, getting it ready to stuff these bad little meatballs!  Like I said before, if you don't do well with dairy or don't like it, then just leave this part out.  The meatballs will still be delicious without the goat cheese.  You could probably use a different type of cheese here too.  Those little buccatini (mozzarella balls) would be perfect for this! I don't know why I didn't think of it before, but now I want to try it... I'll save that for another post, though!


Next, I took a small bit of goat cheese and rolled it into a little ball. 


Then, I took a pretty good amount of the meat mixture, rolled it into a ball, then flattened it so the goat cheese ball would fit in the middle.  


 Next, I put the goat cheese ball in the middle of the meat mixture.  I then wrapped the meat mixture around the goat cheese.  You have to make sure that there is enough meat to cover the whole thing because you don't want the goat cheese to melt and leak out of the meatball when you cook it.


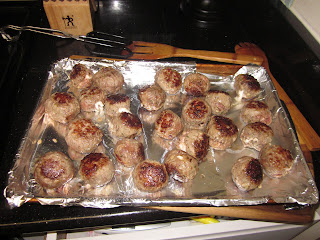
I just repeated this process until I was out of goat cheese and meat mixture.  I lined them all up on a foil lined cookie sheet to get all situated.   


These meatballs turned out to be HUGE, but that's not necessarily a bad thing. 


You can bake these in the oven, but I like mine browned on the stove.  I didn't even need to add any butter or oil to the pan because the meat had enough.  I just turned the stove to Medium High and threw in a few meatballs at a time.  I let them brown and kept moving them so they would cook evenly and not burn.


 So here are the yummy little meatballs, just waiting to be eaten.


As I mentioned before, I served these over a bed of sauteed spinach.  I just threw the fresh spinach in the same pan that I cooked the meatballs.  That way, it didn't need any oil or butter.  It just cooked in the leftover juices from the meatballs.... talk about delicious flavor!


Here's what they look like with the cream sauce.  If you want to make the sauce, it's super easy.  Basically, you put the heavy cream, parmesan cheese, garlic powder, salt, and pepper in a small saucepan and heat everything on Medium heat.  Keep stirring it all so that the sauce won't burn on the bottom (which can happen quickly if you aren't careful).  Eventually, the cheese melts and you have a yummy alfredo sauce that is amazing with the spinach and the meatballs.

I loved this dish.  It was delicious and it was relatively simple.  The best thing about this is that you can double or triple the batch of meatballs and freeze them before you cook them.  Our little Peanut is due to arrive in two weeks (so any time now).  I'm planning to make a batch of these suckers and freeze them so we'll have some food during those first few hectic weeks. 

Enjoy,
Jenn 

Wednesday, September 5, 2012

Paleo Mexican Chicken Soup

It's always important to eat healthy and to nourish your body. Being preggers, I'm even more conscious of what I eat.  I definitely want our little Peanut to grow healthy and strong.  One of the best things to eat is bone broth.  Rather than buying canned chicken broth, it's super easy and super cheap to make it yourself. 

With it being summer, I'm not too terribly in the mood for super thick stews, but more brothy soups.  I've always loved Chicken Tortilla Soup, however, the way I always used to make it was filled with corn, beans, tortilla chips, and cheese.  Being pretty much paleo now, I can't really eat the corn, beans, or tortilla chips.  So.... I decided to create this recipe for Mexican Chicken Soup!


Paleo Mexican Chicken Soup


My baby bump is so big that I can't hide it from the camera anymore...
 you can see the black bump at the bottom of the picture! sorry :)


* 1 whole free range chicken
* 1 tbs fat (bacon fat, butter, olive oil) - I used bacon fat
* 1 red onion, minced
* 2 cans of diced tomatoes
* 1 zucchini
* 4 tbs minced garlic
* 1 jalapeno
* 1 poblano pepper
* 1 red pepper, diced
*1/2 cup of chpped mushrooms
* 1 small can of diced green chiles
* 2 tbs ground cumin
* 1 tbs paprika
*1 tbs chili powder
* 1 tbs. garlic powder
* * 1 tbs dried oregano


The first thing I did was chop up all the veggies and garlic. I wanted to cut all of my veggies up pretty small.  You can definitely leave some of the veggies in bigger chunks, but when I eat soup, I like having a little bit of a bunch of different veggies on my spoon.  But, if you're one of those people who likes big chunks, go ahead and leave big pieces of them in the soup!   

Once all of the veggies were cut, I but the bacon fat into a big soup pot and turned the heat to medium.  Once the fat was melted, I threw the veggies into the pot and let everything start to soften. 

Notice that I left the jalapeno in big chunks.  I wasn't sure how spicy everything would be, so I left them big enough to pull out just in case!


Next, I put the whole chicken into the same pot as the veggies.  Make sure you take all of the organs and stuff like that out of the chicken!  I did season it a little bit withsome salt and pepper, but that's it! After I put the chicken in, I filled the pot with regular old water.  You are essentially making your own chicken stock.


I then stirred up the veggies a tiny bit so that they weren't squished under the chicken.  Then, I covereed it all up with the lid and turned the heat to medium high.  Once the soup came to a boil, I turned the heat down to medium low and let it simmer for a few hours.  If you want, I'm sure that you could throw the whole thing into a crock pot and leave it for a few hours. 


After the soup simmerred for a few hours, the whole chicken should be thoroughly cooked.  I took the chicken out of the pot (very carefully!!!) Then, I let the chicken cool because it was super hot after being in soup for hours!  


Once the chicken was cooled, I shredded all of the whole thing.  This was the part where the dog sat drooling and staring at me for a while.  :)  Once it was all shredded, I threw it back into the pot with the diced tomatoes.  At this point, I had a pretty nice chicken and vegetable soup, but I wanted the yummy Mexican flavors... so I added in the spices - cumin, chili powders, oregano, paprika, and garlic.   I let everything simmer for a little bit longer so the flavors would have a chance to meld together.


So here's the soup!  The whole thing was sooo flavorful!  I garnished the whole thing with some chopped up avocado. It wsa delicious.   I thought it was great and will definitely be making it again.  It was full of vegetables, chicken, and all of the great nutrients of the bone broth.  I loved it and hope you do too!


Enjoy,
Jenn 

Friday, August 3, 2012

Super Simple Slightly Spicy Shrimp Skewers

With my pregnancy, I've been SUPER lucky to not really have any morning sickness!  I've heard horror stories of friends who are sick every day... I guess this baby is just cooperating and taking it easy on me.  While I never actually felt sick, I did have a few food aversions.  The idea of protein just grossed me out.  I could only eat a few bites of chicken or a tiny little slice of steak.  This could really be a problem for someone who typically only eats protein and veggies!  Luckily, even when I was feeling sick, I could almost ALWAYS eat shrimp!  My local Whole Foods sells frozen wild caught key west shrimp.  I'm not really sure what a key west shrimp is, but it was the only frozen option that was wild caught. Each week, I would buy at least one huge bag of frozen shrimp, so that if I was feeling queasy, I could quickly thaw out and cook up a few shrimp.  This recipe is one of the most simple recipes ever!

Slightly Spicy Grilled Shrimp Skewers


*  1 lb of shrimp - preferably wild caught
* 6 cloves of garlic
* 2 tsp paprika
* 1 tsp chili powder
* 1 tsp red chili flakes
* 1 tsp cumin
* 2 tbs olive oil


Some people like to have shrimp with the tail on because it makes a nice little handle when you go to pick them up.  Curt, however, doesn't need or want an extra step between him and food, so I usually just take the tail off and devein the shrimp while I'm  at it. 


 Next, you just throw all of the ingredients in the bowl with the shrimp and mix it all up so that the shrimp have a nice coating.  I usually use my hands because, for me, that's the best way to make sure that everything is thoroughly mixed and that every little shrimp is covered in the flavor.


I let the shrimp marinate for a few hours.  I prepped this in the morning, then just let it sit through the whole day and grilled up the little suckers at night.  You probably don't need to marinate them very long at all since it's more of a dry marinade and would probably stick to the shrimp even if it was only for a few minutes.  


That night when I got home, I took the shrimp out of the fridge and started skewering the bad boys.  I'm sure that if you didn't feel like skewering and grilling, you could just bake them, or saute them in a little bit of fat over the stove.  Coconut oil or some butter would probably work just fine.  I like mine grilled though since it's summer... how many times throughout the year can you really enjoy grilling, right?!


So here are my little skewers all ready to go.  I turned on the grill and let it heat up a bit.  


This is the best part about grilling shrimp.... it only takes a few minutes to cook!  I let them sit for about 3 minutes on each side.  You just want to make sure that you keep an eye on them because overcooked shrimp are rubbery and dry!


So here they are! Yummy grilled shrimp!


I served them with some creamed spinach. Yes, I know that dairy isn't paleo, however, when you're preggers, full fat dairy from grass fed cows is great for the little one... so I've been loading up! If you don't do dairy, you can always find a billion other sides.... some cauliflower rice, sauteed spinach, or even a green salad would be great with these skewers.


I loved this dish.  It was super easy, it was fast, it was delicious, and it filled me up while providing me with some protein.  

Enjoy,
Jenn

Tuesday, June 19, 2012

Spinach and Goat Cheese Stuffed Pork Loin


Summer is here!  I feel like this year has really flown by.  I'm definitely going to miss my students, but I'm also looking forward to some time to relax, enjoy being preggers, and getting the house prepared for a little one to take over!  With the increase in free time, I'm also looking forward to trying out some new recipes and experimenting.  I've never been a huge fan of pork because if it isn't done correctly, it can be really dry.  I've found that by stuffing it, though, you can add lots of flavor and keep it very tender!  Here's one experiment that went well:

Spinach and Goat Cheese Stuffed Pork Loin  


* 1 boneless pork loin (3-5 lbs)
* 3/4 cup frozen chopped spinach
* 3/4 cup goat cheese (optional)
* 1 Tbs. dried oregano
* 1 tsp garlic powder
* 3 cloves garlic, minced
* 1/2 cup onion, diced
* 1 Tbs. butter/bacon fat


First, I wanted to start off by making the "stuffing." I used bacon grease as my fat to get the whole thing going.  I added in the onions and the garlic and sauteed them until they got nice and soft.  Then, I added in the spinach and let everything mix together.


While the "stuffing" was cooking, I butterflied the pork loin.  It wasn't too hard to do, but it allows you to really get an even layer of pork so it all cooks relatively evenly.  If you don't know how to do it,  Here's a video on how to butterfly a pork loin. 


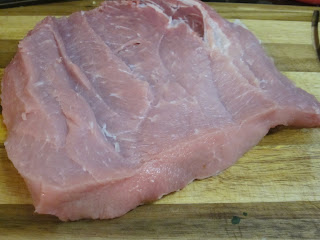
So here's the pork loin after I butterflied it.  I also took a mallet and pounded it out a bit to make sure it as even as it could get.  I then sprinkled both sides with salt, pepper, and the garlic powder just to give it some flavor.


Next, I added the goat cheese.  Now, I know that cheese isn't paleo, however, I'm following Chris Kresser's The Healthy Baby Code and according to that, dairy is good :)  I just eat full fat, grass fed dairy.  If, however, you don't do well with dairy, then just skip this part.


Next, I put the spinach mixture layer right on top of the goat cheese.  It was starting to look good!


Very carefully, I rolled the pork loin up into a nice little oblong bundle.  After that, I tightly wrapped the whole thing in plastic wrap to help it keep its shape and let all the flavors meld together.  Also, I didn't have time to cook it that night, so I just let it sit overnight.   


The next night, I unwrapped the pork loin and tied it up. 


You probably don't need to do this step, but I did just because i didn't want to risk cooking the roast and have it all unravel, leaving a sloppy mess on the baking pan.


I had preheated the oven to 350, so when it was ready, I put the whole roast on a roasting pan.  You could probably just put it on a regular baking pan, but when you lift the roast up so the air can circulate underneath the roast, it cooks more evenly and you get a little color and crispness on the bottom too (which is something I like).


I baked it for about 45 minutes.  I wanted it to be cooked all the way through without being dry.


I let the whole thing rest for about 10 minutes so the juices would all redistribute.  Then, I took a nice, sharp knife (I just bought a great new set!! YAY!!!) and cut a few slices.


So here they are!  They looked so pretty and they tasted great too!  There was already a bit of spinach in them already, so I served them with some broccoli as a side.  The whole thing was yummy... it had flavor and wasn't dry.  It's definitely a keeper!  I also liked the technique because it kept everything tender and there are so many options!


Enjoy,


Jenn 

Friday, May 4, 2012

Paleo Triple Meat Meatloaf

So I've come to the realization that when little baby C comes, I'm probably not going to be able to stick with my Sunday routine of strolling around Whole Foods and farmers markets for hours (yes, I said hours - as sad as that is) figuring out what I'm going to cook for the week.  If I want to be supermom and continue making homemade meals, I'll have to be a bit smarter with my time.

With this in mind, I'm starting to use >gasp< grocery lists!  I figure out what I'm going to make, then write down the ingredients, then when I get to the grocery store, I just buy the things on that list! (Except the occasional splurge item for fun).  This past week, I rummaged through the freezer to see what I had... I found sweet Italian sausage and some ground beef.  I had made spaghetti squash with meat sauce last week, so I didn't want to do anything Italian... so... I decided to go all-American and make meatloaf!

Triple Meat Meatloaf

* 1 lb ground beef
* 1 lb Italian sausage
* 1 handful fresh parsley
* 4 cloves of garlic, minced
* 6 slices of bacon
* 1 yellow onion, diced
* 1 tbs Worcestershire sauce
* 1 egg
* 1 tbs mustard (I used stone ground)
* salt and pepper


First, I put the sausage and the ground beef in a bowl. I removed the casing from the sausage.  I used sweet Italian because that's what I had in the freezer, but use whatever you have!


Next, I just added in all the other ingredients, except the bacon.  I chopped the parsley up pretty finely.  I bought a huge bunch of it at the store, but saved the rest for other recipes.  If you still have extras, freeze them and save them for making chicken stock!


Next, I mixed everything by hand.  I'm sure you could use a spoon or fork or something if you're one of those people who doesn't like to touch raw meat.  Personally, I feel like I have a better sense of how well everything is combined if I can actually feel it.  Make sure everything is well combined, especially the egg.  The last thing you want when you bite into the meatloaf is one big bite of cooked egg!  Most meatloaves call for breadcrumbs soaked in milk or crumbled Ritz crackers or something like that.... the theory is that it keeps everything moist.  I find that it's completely unnecessary (and un-Paleo). 

Next, I formed the mixture into a "loaf."  It's kinda like playing with play doh.  You just keep patting and pushing at it until it is in the shape you like.  I formed it in a loaf and set it on a cooling rack, set inside a jelly roll pan.  Many people just throw the whole thing in a loaf pan, which is totally fine. I just wanted mine to cook all the way through and not sit in it's juices or become soggy.  Others may feel, though, that sitting in its juices will help add flavor... to each their own!


Next, I wrapped the whole stinkin thing in bacon... yup... bacon.  I've seen people do this before and I decided to do it because: I love the flavor of bacon and I had some. :)


So, after the whole thing is nicely wrapped, I just gave it one more pat down and threw it in the oven at 350. 


It didn't take too long to cook, relatively speaking.  It was in the oven for about an hour.  The bacon crisped up really nicely and also served as a little insulation to keep all of the yummy flavors in the meatloaf.  Like all meat, you want to let the meatloaf rest a bit so all of the juices don't run out. 


So here's the final product!  What is meatloaf without mashers?  Rather than mashed potatoes, I used mashed cauliflower.  It's super easy to make and tastes delicious!


I thought the meatloaf was very moist and flavorful.  I don't think anyone would notice the fact that there is no bread or anything in the meatloaf.  The only thing I think was missing was some ketchup!  I know, I know, ketchup isn't paleo, but having a tiny bit of ketchup every once in a while isn't the end of the world to me :) If you're truly a Paleo person, you could always make some Paleo ketchup on your own!

Enjoy,
Jenn