Monday, February 22, 2010

Cod with Prosciutto Topping

Typically, I'm a meat girl. I like steak... I like burgers... I like bacon... I like hot dogs... I like chili... unfortunately, I know that red meat isn't that great for you, especially in large quantities. That being said, I'm trying to fit more fish into my diet. I actually love fish, but I don't like it when it's reheated, so whenever Curt and I have time to cook dinner together (which consists of Curt watching TV while I tinker around in the kitchen) I try to make fish.
A few months ago, I found this recipe in a New England Cookbook. The original recipe was for "Baked Cod with Crispy Proscuitto Topping." The recipe said that you should roast the fish in a pan with some white wine. I thought I would switch it up a bit (surprise, surprise) and pan fry the fish to give it a crispy texture. I also made a sauteed mushroom and green bean side dish with the extra garlic and prosciutto. Who can live without a bit of starch? I added some fresh mashed potatoes. For an appetizer, I made some bacon wrapped shrimp. Here's the story of our dinner :)
The Players
( I can't figure out how to rotate this picture, sorry!)
Bacon Wrapped Shrimp
This is the easiest appetizer ever... I grabbed a few jumbo gulf shrimp and a few slices of bacon. Cut the slices of bacon in half and wrap 1/2 around a shrimp, so they look like this one on the right:
Once all the shrimp is wrapped, place them seam side down in a pan on medium heat. You don't really need any oil in the pan because there is enough fat in the bacon to prevent the shrimp and bacon from sticking. I did give the pan a few spritzes of Pam, though.
The great thing about the shrimp is that they are so easy and fast! They only need a few minutes in the pan to cook all the way through. Once the shrimp starts turning a bit opaque, then flip them until the bacon starts to brown and get crispy. Remove from the pan and set aside for later, or give to your hungry spouse who is complaining of hunger from the couch. :)
( Look how delicious these little guys are!)
Crunchy Cod with Prosciutto Topping
* 2 oz. chopped prosciutto
* 1/4 cup flat leaf parsley
* 1 tbs dried basil
* 1 large clove garlic, minced
* 1/4 tsp black pepper
* 2 tbs. olive oil
* 4 (6 oz) cod fillets
* 1 egg, beaten
* 1/2 cup flour
The first thing you do is take care of the fish. Pat it dry, then season with salt and pepper of both sides. Set up 2 bowls, 1 with the beaten egg and 1 with the flour. First, you'll dip the pieces of cod into the egg.
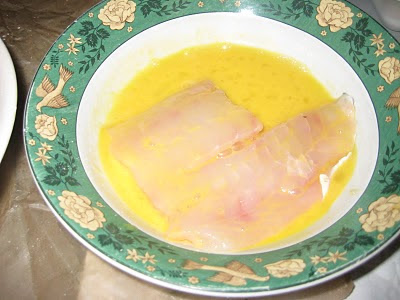

After the cod is covered with the egg, you will dip it into the flour until it is totally covered. This part gets pretty messy, so it helps if you have 1 hand that is dry and 1 that is wet... this will avoid a messy paste of egg and flour covering your hands.

( You can't really see the fish too well since it's so bright!)
In a pan, heat some oil to medium heat. I like using a canola oil because it can tolerate the high temperatures. Anyway, you will know that the oil is hot by doing the stick test... just stick the end of a wooden spoon into the hot oil. When you see little bubbles come out of the spoon (you are essentially frying the spoon), you will know the oil is hot enough.
Gently place the covered fish in the oil a few pieces at a time. Make sure that you don't put too many pieces of fish (or anything you fry) at one time. If you "crowd the pan," the temperature of the oil will drop, which will mess with the way that the fish cooks.


Once the fish is browned on one side, give it a flip and let the other side brown. The fish doesn't exactly need to be cooked all the way because you will be putting it all in the oven a little bit later. As for the frying, I'm not sure if there's a rule about how many times you flip it, but I try to only flip the fish once.
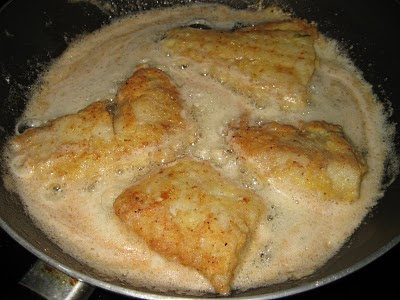
After the fish has cooked, put it on a plate, lined with paper towels to let the excess oil drain off the fish so it isn't greasy. Just set them aside while you make the yummy topping!

For the topping, just chop up the prosciutto, then mix it with the basil, garlic, and the parsley. All I did was mix it all together in a bowl and then plop it in a pan.

( I love all of the bright colors in this)
I decided to cook everything in a pan to give the prosciutto a chance to crisp up. With the fish being crunchy, I thought that the prosciutto should be a bit crispy too.

I didn't want to cook the topping too much, just give it a bit of texture, so after a few minutes, I removed the pan from the heat and let it all cool. Next, I divided up the topping evenly and placed it on each piece of cod. I placed the fish on a baking sheet and stuck them in the oven under the broiler for a few minutes. I then realized that there was no cheese in the meal! So I sprinkled a bit of parmesan cheese everything, then put it back in the oven. I only cooked it all for a few minutes under the broiler. Make sure you watch the fish carefully; I've burned my fair share of food when I stepped away from the oven for just a few minutes!

Ta Da!
Green Beans and Mushrooms with Prosciutto
Next, I made the veggie side dish. I had some extra prosciutto, so I put it on a baking sheet and then stuck it in the oven for a few minutes to let it all crisp up. Remember the comment earlier about forgetting things under the broiler? Well, yeah, I did it again, so the prosciutto was a bit more well done than I had planned, but oh well!

This was a pretty easy dish too... I find that if you take some good, quality ingredients, you can whip up a quick and easy dish that is delicious! Anyway.... I just cut ung up a bit p the green beans and mushrooms and threw them in a pan with some canola oil. I just stirred everything up and added the prosciutto. I also sprinkled a bit more parmesan on top of everything... five minutes later, you have a delicious side dish!


So... here's the finished product! Dinner was yummy and although it was fish, I managed to sneak a little bit of meat into it anyway!


Thursday, February 11, 2010

Maple Roasted Chicken

Everyone that knows me well knows that I love to cook... I think I tell just about everyone how much I enjoy chopping onions and preheating my oven. It's no surprise that for my bridal shower last May, my bridesmaids came up with the theme, "bed and breakfast." Each guest arrived with a cute little recipe card for me, complete with their favorite recipe. I collected some really great recipes! This recipe is from my mother in law. It's called Maple Roasted Chicken.
I must admit that I was a bit skeptical when I saw this recipe. I like maple syrup, but on pancakes and waffles... I wasn't sure if I'd like it on chicken. I decided to give the recipe a try; if I didn't like it, I knew that Curt would eat it all anyway. In the end, I think this is a fabulous recipe with a great flavor!

MAPLE ROASTED CHICKEN
*1 whole roasting chicken
* 1 turnip
* 2 sweet potatoes
* 2 onions
* 3 large carrots
* 1 1/2 cups cremini mushrooms
* 1 lb asparagus
* 2 tbs butter, melted
* 1/2 tsp salt
* 1/4 tsp black pepper
* 1/2 tsp rosemary
* 1/2 cup - 3/4 cup maple syrup
*~*Note: this recipe called for your choice of 4 winter vegetables such as carrots, onions, celery, parsnips, winter squash, sweet potatoes... I chose carrots, onions, sweet potatoes, and turnips, but also added mushrooms and asparagus because I LOVE them *~*
( I only ended up using 1 chicken, even though I planned to use 2)
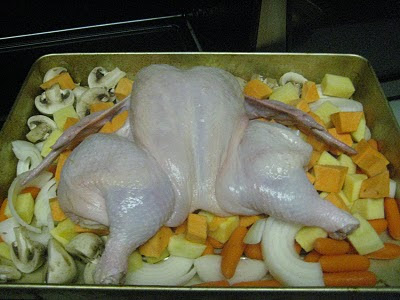
I started making this dish a bit later than I had expected, so rather than roasting the chicken whole, I spatchcocked it. What the heck does spatchcock mean? Basically, you remove the backbone of the chicken, flip it over, and press it down to flatten it. This helps the chicken roast faster. I used a pair of kitchen shears and cut that bad boy out! Make sure you save the backbone (just stick it in a bag and throw it in the freezer) because you can make some great chicken stock with it!
Ok, so the spatchcocked chicken looks a little weird, and it was kinda strange to be taking a pair of scissors and cutting through bones, but who cares... it will still taste good, right?
( how the heck do you use/cook/roast/cut a turnip?!)
For my choice of winter vegetables, I used a turnip - not because I like them or because they were on sale... I've never in my life really eaten one (except for the turnip cakes with shrimp at dim sum) much less cooked onw, so I figured I might as well give it a try. It had a sort of waxy feel to the outside, and I wasn't really sure how to prepare it. I decided to peel it with a vegetable peeler, then chop it into 3 inch pieces. Make sure you cut all of the vegetables to about the same size so they roast evenly.
( Here's what the spatchcocked chicken looks like when you flip it over)

It took a while, but I finally chopped all the vegetables... carrots... onions.... sweet potatoes.... turnips... mushrooms, etc... and threw them in the pan
( Can you believe I got Curt to eat all of these vegetables?!)
Next, just place, the chicken on top of the vegetables. When you roast a chicken (or anything for that matter), you are using dry heat to cook the food. It is important that air is able to circulate around the piece of meat to ensure that the air is able to reach all sides evenly. This will sort of cause the surface of the food to caramelize which enhances the flavors. If the chicken is just resting on the pan, then it will cook in the juices, which won't necessarily be a bad thing, but it's not a traditional roast. At least that's what wikipedia says!
( The poor little chicken looks so pale!)
In the microwave, melt the butter, then brush it on the chicken. Sprinkle with salt, pepper, and rosemary. Place the chicken in the oven (I forgot to tell you to preheat it to 400!). Every 10 minutes, baste the chicken with the maple syrup. Once you run out of maple syrup, continue to baste with the pan juices.
(Deliciousness)
Keep basting until the chicken is cooked all the way through. The chicken should be crispy and brown on the outside and the vegetables should be sweet and soft.
( The house smelled FANTASTIC while this was cooking!)

Let the chicken stand for 10 minutes to let the juices redistribute. Place the chicken on a nice platter and surround with the vegetables.
( How beautiful does this look?!)
This dish was absolutely fabulous! Everything tasted delicious. The chicken soaked up the maple syrup flavors, but the chicken juice mixed with it to make a great mellow pan sauce. I packed up the leftovers in some tupperware and had them for lunch the next 2 days. I think it might have been even better because the juices had more time to soak through the chicken and into the vegetables. Speaking of vegetables, Curt ate EVERYTHING! Even the turnips - OK, so he didn't know that they were turnips... I kinda let him think that they were regular potatoes, but no harm done, right?

Jerk Chicken


(Our Subdivision Sign)
We have been getting soooo much snow here in Virginia that I don't even know what to do with myself... besides cook! Here in Virginia, we don't usually get more than a few inches of snow each year (and even that's rare). This year, however, we've been getting tons! I don't even remember how much we've gotten this winter, but it's almost broken the record for the snowiest winter since they started recording snow amounts!
I've been working at my jobs a lot and was super excited at the possibility of just staying at home for a while. Like everyone else in the northern Virginia area, I headed off to the grocery store to pick up plenty of stuff to keep me busy cooking while stuck in the house. With the weather being so cold, I was daydreaming of weather like this:
 
In that light, I decided to make some jerk chicken. That's a pretty tropical dish, right? Maybe if I pretend hard enough, a plate of jerk chicken could make me feel like I'm in the Caribbean... right?


(There are PLENTY of ingredients needed here)

I'd made this recipe before and really liked it (check out my posting on October 3 about Curtman cooking). I found the recipe in a BBQ book I found at a used book store!


Here's the recipe for my super great marinade!


Jerk Marinade


* 3 jalapeno peppers
* 1 medium onion
* 2 shallots
* 2 bunches of scallions
* 4 large cloves of garlic
* 1/2 cup flat leaf parsley
* 1/2 cup cilantro
* 2 tsp. fresh ginger
* 2 tbs salt
* 1 1/2 tsp. thyme
* 2 tsp pumpkin pie spice (sounds weird, I know)
* 1 tsp allspice
* 1/2 tsp cinnamon
* 1 tsp. pepper
* 1/4 cup lime juice
* 1/4 cup vegetable oil
* 1/4 cup brown sugar
* 1/4 cup water (more if needed)


That's a lot of ingredients huh?!


Since I have an old school food processor, I just put in the first half of the ingredients first... garlic, onions, shallots, jalapenos, scallions, ginger, parsley and cilantro... Then I just whirled it until it was all chopped up.


(Don't laugh, I know it's old!)

Be careful when you take the lid off... all the powerful smells of the onions, shallots, jalapenos, garlic, etc.... they really hit you in the face! My eyes immediately started watering!
(the smell is great but SUPER strong!)

Then just throw in the rest of the ingredients and process until you get a nice paste that looks like this:


The whole recipe makes about 4 cups of marinade that I just put into a canning jar, labelled, and stuck in the refrigerator. I did use about 2 cups of the marinade for the chicken dish I was making that day though. The book I found this recipe in suggested using this marinade with a leg of lamb which sounded really yummy. I didn't have leg of lamb, but I did have chicken tenderloins, though!

I stuck the tenderloins (about 10 of them) in a clear glass bowl and covered them with about 2 cups of the marinade. After stirring them a bit to make sure that they were thoroughly coated, I just stuck the bowl in the refrigerator for a day.
(YUMMMMM)
After a day of marinating, I was definitely ready for some chicken! In the past, I've grilled the chicken on skewers with some pineapple. Since our grill was covered in 2 feet of snow, I decided to just sear them on the stove.Because there is oil in the marinade, I didn't need to coat the pan much. Just a few sprays of Pam and down into the pan they went.
 
Like I said before, I usually grill the chicken with some pineapple. I think the sweetness of the pineapple really goes well with the flavors of the jerk marinade. So... I decided to experiment. I threw some canned pineapple chunks in a baking dish and covered them with a little bit of the jerk marinade.
Since I just seared the outside of the chicken, it needed to cook a bit more. I threw the seared tenderloins in the baking dish with the pineapple and stuck the whole thing in the oven on a low broil. I wasn't too sure how it would turn out, but it was great! The broiling was perfect because it allowed the pineapple to brown up a bit and caramalize like it would on a grill. Also, the juices of the pineapple and chicken got to mingle which kept everything super juicy.
(Fresh pineapple probably works best, but i didn't have any!)
I wasn't too sure what to make for a side dish. I wanted to keep the fruity theme going throughout the meal, so again, I experimented! I threw some brown rice, lentils, and raisins in my rice cooker (I'm half Filipino - of course I have a rice cooker!) and hit the go button. It turned out really well and seemed to really complete the dish!

Curt even went back for thirds! There was only a little bit left over... but those were gone before I could even have a plate for lunch the next day!

Wednesday, December 23, 2009

Christmas Baking

Growing up, my family would pack up our things each Christmas and pile into the mini van to head to my Grandma Joy's house in Springfield, Illinois. After hours in the car, my family would tumble out of the van and into Grandma's house where she would always have dozens of cookies waiting for us. Grandma Joy would make what seemed like thousands of cookies to give away to family and friends in old coffee cans and festive Christmas tins. Piecrust kisses, oatmeal scotchies, thumbprint cookies... sooo many different varieties. A lot of my Christmas memories are centered around the traditions started with my dad's side of the family... I think my love of baking began in Grandma Joy's kitchen.

This year, Curt and I decided to spend our first Christmas as a married couple with his family up in Massachusetts. It was really nice to be part of the Congdon/Iemolini family traditions. I wanted to bring some of my family traditions up to Massachusetts.... so along with having blueberry muffins on Christmas morning, I baked!

I had already baked 10 dozen cookies to give away to our neighbors and co-workers, so I decided to try something new.... Cranberry Orange Bread.

Cranberries are all over the place during the holidays and I wanted to take advantage of them... these tart little fruits have tons of antioxidants, so they are great for you and they taste great too!
CRANBERRY ORANGE BREAD
* 2 cups all purpose flour
* 1 1/2 tsp baking powder
* 1/2 tsp baking soda
* 1/2 tsp salt
* 1 tbs orange juice
* 1 1/2 cup fresh cranberries
* 1/2 cup chopped pecans
* 1/4 cup butter, softened
* 1 cup white sugar
* 1 egg
* 3/4 cup orange juice


Preheat the oven to 350 and grease a loaf pan. Since I was giving these little loaves away as gifts, I wanted to give away a smaller size. I found these adorable little loaf pans at Michaels, so I used those and they turned out to be super cute!
In a large mixing bowl, cream the sugar and margarine. Add in the egg and the orange juice and mix until thoroughly combined.


Slowly add in the flour, baking powder, salt, and baking soda and mix until just combined.
Next, add in the cranberries, pecans, and orange zest, then mix until combined.

(It took about 1 orange for 1 tbs of zest)
In the first batch I made, I put the cranberries in whole, but Curt thought it was a bit too much cranberry in one bite. For next batches, I cut the cranberries in half (thanks to the suggestion from Genelle!!!). The taste seemed to be a bit more evened out.


Pour into the greased loaf pans, then bake for an hour, or until a toothpick inserted comes out clean.

And now for the finished product!


I thought that the breads looked pretty good once they were finished... but who would complain about a little bit of extra sugar?

(now that's a lot of bread!)

I made a little glaze by mixing together some powdered sugar and some orange juice until it had the right consistency. Then, I just drizzled it over the little loaves of bread. I think it gave the bread a nice sweet touch. Everyone loved it!


I couldn't just give out the bread in the pans, so I wrapped them in a bit of festive green cellophane and tied them up with red and white ribbons.


Cute huh?


(aren't the little loaf pans cute?!)

Tuesday, December 8, 2009

Thanksgiving

Thanksgiving is one of my all time favorite holidays. For Christmas, my family always did different things, such as travel, volunteer at soup kitchens, etc... but for Thanksgiving, my parents, sister and I would always be at home watching the Macy's Thanksgiving Parade in our pajamas while my mom started on the Turkey and my dad started on his famous stuffing.

While we spend the actual day of Thanksgiving with family, we have started a Thanksgiving Potluck for friends to attend as well. My girls LOVE any excuse to get together for some cocktails and food, so what better excuse than a holiday?!
As you can imagine, I cooked and baked a LOT of stuff over the past few weeks, so I'm just going to post a few highlights as well as pictures!
Thanksgiving Potluck!
Because there were about 20 people at the potluck, we made a turkey and a beef tenderloin for the main dishes. The turkey roasted in the oven for a couple of hours and came out a delicious golden brown.

For the beef tenderloin (modeled below by my adorable Curtman), I let it come to room temperature. I made a paste of rosemary, olive oil, garlic, salt, and pepper and rubbed it all over the tenderloin. I let it marinate for about an hour. Then I wrapped it in bacon and put it on the grill. Bacon is great on everything, but I wanted to wrap it around the tenderloin so that it would stay tender with all of the bacon fat. Because there were about a million things in the oven, we cooked it on the grill. After pulling it off the grill, I let it rest for about 15 minutes to let the juices redistribute.
(Doesn't Curt look cute with an oven mitt?)
My dad made his famous dressing for the occasion. I have no idea how he makes it or what he puts in it (I do know that he does soak the raisins in red wine to give them a little kick). It's really yummy though!

(Here's the gravy and dad's dressing)
I also made a corn casserole, creamed spinach, and a macaroni and cheese. For the corn casserole, I used a recipe from my friend Rebecca!
(Angela's Sweet Potato Casserole and my Macaroni and Cheese)

The macaroni and cheese didn't really have a recipe. I just cooked the pasta and put it in a baking dish. In a saucepan, I melted different cheeses together... I don't remember what type I used... but I think cheddar, muenster, and pepperjack were included in the mix. I added some heavy cream to the mixture to make it creamy and thick. Then I just poured the cheese mixture over the noodles and mixed it all together. I topped it with a few handfuls of breadcrumbs and baked until the top was a nice golden brown.

(Here we have some garlic mashed potatoes -compliments of Billy-,
homemade cornbread -thanks Brook!- and my corn casserole)
Last year, Angela made this AMAZING sweet potato casserole, so I begged her to make it again. So... here it is with the macaroni and cheese.
Kylie was so hopeful that someone would drop food... she has such a cute face that I'm sure someone caved and dropped a bit of food. Last year, she managed to make away with a whole turkey leg because it was close to the table's edge. This year, I had to watch her very carefully!

(Here she is pouting because I made her leave the dining room)
Of course, we had tons of yummy desserts (rice krispy treats, cookies- thanks Caroline, apple pies- thanks to Kimba, etc...) but I forgot to take pictures of them (turkey coma). We also had some really good appetizers... Billy made guacamole and Julia made some really good shrimp and crab dip. Next time, I'll have to remember to take more pictures!
Thanksgiving Day
Since we were kinda turkeyed out from the Thanksgiving potluck, my mom decided to make prime rib instead. Can you say "Delicious!!!" ?
(Here's the prime rib! Soooo yummy!)
Since my sister's in Africa, having a huge feast for just my parents, Curt, and me didn't make sense. We ended up going to a family friend's house to celebrate with her and her family. She made a turkey and some mashed potatoes and a few other side dishes. We brought the prime rib, creamed spinach (I like it so much the first time that I decided to make it again), a lobster dip appetizer -served on cucumber rounds to save on calories, and a meringue cake.

(Here's the lobster spread on cucumber rounds!)
The creamed spinach was really easy! Here's my recipe!


* 5 Tbls. butter
* 1/4 cup all-purpose flour
* 1/4 tsp. salt
* 1/4 tsp. black pepper
* 1 dash ground nutmeg
* 1 cup half and half cream (I used fat free to save on calories)
* 4 oz. cream cheese (again, I used fat free)
* 1 small onion - minced
* 3 cloves garlic - minced
* (2) 10 oz. pkgs. frozen chopped spinach - thawed
* 1/4 cup water
* 1/4 cup grated Parmesan cheese
In a saucepan over medium-low heat, melt 3 Tbls. butter, then stir in flour, salt, pepper, and nutmeg.
Slowly, whisk in the half and half, then stir in cream cheese. Increase heat to medium and whisk mixture constantly until thick and smooth. Remove from heat and set aside.

In a skillet over medium-high heat, saute the onions and garlic in remaining butter until they are soft and cooked through.

Stir in the spinach and water, then reduce heat to medium-low; cover; simmer, stirring occasionally, for 8 minutes.
Stir spinach mixture into creamy mixture; return to medium heat; heat, stirring often, until warmed throughout.
Remove from heat; fold in Parmesan. I had extra Parmesan, so I topped the whole thing with the rest of the cheese.

It was delicious!