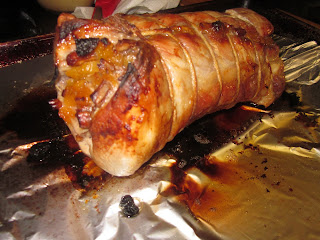
Friday, February 3, 2012

Fig and Chile Glazed Pork Tenderloin

This past weekend, my friend Anne and I went to Chicama Run to pick up some more meat since Curt and I were running low!  In addition to buying a "Box of Beef," I happened to pick up some pork tenderloin!  I tend to stay away from pork tenderloin because it can be dry if you don't cook it right.  Also, I find that there are a lot of plain old boring pork tenderloin recipes.  I looked on my new favorite website, Pinterest, and found this recipe which looked amazing!  Here's the recipe!

Fig and Chile Glazed Pork Tenderloin


1/2 cup fig preserves
1/4 cup rice vinegar
1 tbs chile paste with garlic
 1 tbs soy sauce (or coconut amino/wheat free alternative)
1 tsp kosher salt, divided 2 (1-pound) pork tenderloins
1/2 teaspoon freshly ground black pepper  


So this was easy peasy!  First, just mix all of the ingredients ( fig preserves, rice vinegar, chile paste with garlic sauce, and soy sauce) in a small bowl.  I was able to find some fig preserves that were only fig and some pectin, so pretty much paleo :)  Also, for the soy sauce, you can either use the coconut amino things that is a soy sauce alternative or else at least go for a gluten free soy sauce! 


My mother in law had given me a tiny little wisk for Christmas one year and this was the perfect size for wisking all of the ingredients together!  I must admit that I was a little skeptical of this recipe, but I figured I'd give it a try.  I liked all of the ingredients individually, but I wasn't sure about how I would like them when all mixed together!


Next, I had to take the silverskin off the pork tenderloin.  The silverskin is the thin, white membrane along the pork tenderloin which connects it to the actual pork loin.  You don't want it for a few reasons.  First, it doesn't look pretty when you cook it.  Also, it is tough and chewy when it is cooked.  Chewy is great when you're describing gum... not so much when you're describing a pork tenderloin.  Anyway, you just take a short and sharp knife and make little cuts and pull it away from the tenderloin.  Make sure to be careful not to cut the meat itself!


So here's the lovely little pork tenderloin.  I took the salt and pepper and seasoned the tenderloin on all side.  This was a snap!  Meanwhile, heat up a skillet to very very hot!  I used an oven safe skillet so that I could just throw the whole thing into the oven afterwards.  That reminds me... heat the oven up to 350!


Next, you want to brown the pork tenderloin.  I did put a little bit of bacon fat into the pan to help the tenderloin brown a little bit.  You just want to brown the whole tenderloin.  You will cook it the rest of the way in the oven.  Caution - this browning may cause smoke in your house and may set off a fire alarm - mine is almost permanently disconnected!


Next, with the tenderloin still in the pan, I spooned the fig mixture over the tenderloin.  I put almost all of the mixture over the pork tenderloin.  Then, I put the whole thing in the oven.


Since my pork tenderloin was somewhat tiny, it really didn't take long at all to cook.  It was in there for about 15-20 minutes, depending on how well you like your pork cooked.  I trust the farm where mine came from and I don't like things dry, so mine was cooked about medium to medium wellish.


Next, I removed the pork tenderloin from the pan and set it on a plate to rest and let the juices settle down.  The last thing you want is to cut into it immediately and have all of the flavor run out everywhere.  While I was doing this, I set the pan back on the stove, over medium heat.  Make sure you don't burn your hand when you touch the pan... remember - it's been in the oven!!!  I thickened up the sauce a little bit and added a little pat of butter to finish it off.  I let everything get all mixed up nicely and whisked it together.


When the tenderloin had settled, I sliced it up and spooned the fig chile sauce over the top.  I have to tell you that this unlikely combination was amazing!!! It was sweet and spicy and salty and delicious!  I'm definitely making this one again!!!  Curt loved it too :)


Pure deliciousness!  I think I served mine with some broccoli or some other green... maybe asparagus? I don't remember... I do remember how good this recipe was though!

Enjoy!

         Jenn

Saturday, January 7, 2012

Super Short Ribs

So one of my New Year's Resolutions is to become more efficient at the grocery store.  I can literally spend hours at Whole Foods... Curt is amazed at the amount of time I spend there.  Part of the reason I take so long is that I don't have a grocery list.  Sometimes, I have an idea of what I want to cook, but when I get to the store, I get dazzled by the arrays of veggies and meat counter, that I forget what I wanted.  Anyway... the point is.... I'm trying to write a list of the dishes I'll make each week and also write down a specific shopping list.  Last Saturday, as I was creating my list, I checked Pinterest (one of my new obsessions) and I found this idea from Pioneer Woman.  It looked delicious and different, so I decided to give it a try!  I LOVED it!!! Also, I didn't really need to change much from the recipe at all!

Short Ribs with Wine and Cream
original recipe from Pioneer Woman Cooks


* 12 individual short ribs
* 3 Tbs bacon fat
* 1 cup good red wine
* 1 qt chicken stock
* 2 Tbs fresh minced rosemary
* 2 Tbs Dijon mustard
* 1 cup heavy cream (optional)
* 2 Tbs capers


First, I seasoned the short ribs on both sides with some salt and pepper.  I also heated up my heavy bottom cast iron pan and added in the bacon fat.  You want the pan to be super duper hot so that you can sear the short ribs. 


So here, you can see me browning the short ribs.  The point isn't to cook them through, but to develop a nice brown sort of crust to seal in all of the yummy flavors.  Once each side is nicely browned, you take them out and put them on a separate plate.  You'll have to cook them in batches, unless you happen to have a freakishly large pot!


Once you're done, you'll have a huge pile of nicely browned short ribs.  Just let them hang out a bit and turn the heat on the stove down to medium.


Next, you'll add the red wine and mustard to the pot.  Don't worry about the browned bits at the bottom of the pan... even though it looks like gunk... it's the most delicious gunk ever!  Once the red wine is in there, take a wooden spoon and scrape up those bits and they will dissolve and add so much flavor to the meal!


Next, add in the chicken stock and rosemary.  The original recipe called for beef broth.  I think this would have been really really good, but... I didn't have any beef broth.  I did have home made  chicken stock, so I figured that would be a nice enough swap.  Luckily, it worked! 


 Next, you'll add the short ribs back to the pot and nestle the little ribs as much as possible into the sauce.  You want to have it covered as much as possible.  Then, you'll cover it, reduce the heat to medium low, and the patience comes into play.


You just set it and forget it.  You'll simmer the whole dish on the stove for 2-3 hours.  You could probably also throw it in a crock pot or the oven for a couple of hours too.This is a cut of meat that needs to be cooked low and slow to really enjoy all the flavors.  If you try to rush it, it will be tough and not as flavorful.   Every 30 minutes, I opened the lid so I could enjoy the smells, but also so I could push the short ribs around and make sure that they were all getting a turn to be covered by the broth.   


Finally, Curt was getting annoyed that he could smell all the yummy food, but he couldn't eat it.  After 3 hours, I carefully took the short ribs out and set them on a different plate.  You have to be careful because, at this point, they are so tender they they will just fall apart when you touch them.


Next, I turned the heat back to hi and added in the cream. At this point, it was really really really starting to smell good.  I also added in the capers.  I wasn't sure about this part of the recipe... I don't dislike capers, but I've never really added them in for fun either.  So, I just let it boil pretty nicely for a cood couple of minutes to thicken up a bit.    While I was waiting for the sauce to thicken, I sauteed some asparagus.  The Pioneer Woman (Ree) originally served it over a pile of roasted mushrooms, but we all know that Curtman's not a fan of mushrooms, so I chose asparagus.... I did add in some mushrooms for me, though.


Here's the finished product!  Absolutely amazing! The rosemary and cream and wine and beef... just everything! It was so good! I'm definitely making this recipe again and again. It was relatively simple, super delicious and the flavors were great.  Short ribs are really trendy now, but most of the recipes are pretty similar.  This one is different, unique, and delicious! Thanks, Pioneer Woman!

Enjoy!

Jenn

Wednesday, December 28, 2011

Apple Sweet Potato Bake

In my last posting, I made this yummy Stuffed Pork Roast.  I was surprised at how well it turned out!  I needed a side dish to go with it, so I pulled out this recipe.  When we were in Massachusetts over Thanksgiving, my mother in law had this Kraft magazine that had a bunch of recipes.  Many of them were FAR from paleo, but this one seemed promising.  By the time we had gotten back to Virginia, my sister in law, Tracee, had texted me saying that it was really good!  So here it is... with a few minor twists, of course!

Apple- Bacon Sweet Potato Bake


* 1 large onion, chopped
* 6 slices bacon, chopped
* 2 large sweet potatoes, peeled and cut into chunks
* 2 apples (I used Braeburn), peeled and chopped
* 1/2 cup apple cider (no sugar or anything added- just apples)
* 1 tsp. ground cinnamon
* 1/4 cup chopped pecans


This recipe was easy peasy.  First, preheat the oven to 350.  Then throw the chopped bacon into a pan on medium high heat and let it get nice and crispy.  Once it's crispy, turn the heat down to medium low and remove the bacon to a separate plate.  Keep the bacon fat in there because that's what you'll cook the onions in.  Make sure you let the fat cool down a bit because you don't want to fry the onions, just make them soft. So you throw the onions in there and cook until soft.  Then add the bacon back to the pan for another minute or two.


While all the bacon and onions were cooking, I took the time to chop up the apples and the sweet potatoes.  Then, in a baking dish, just throw the cubed sweet potatoes and the apples.  Mix them up so they are all combined nicely. 


Next, you'll add in the apple cider and cinnamon.  Then, you'll mix everything up so it's evenly distributed.  You could use a spoon to make sure it's evenly distributed, but I think using your hands is easier and faster... and why dirty a spoon when you don't need to, right?


Next, pour the bacon and onion mixture over the sweet potato and apple mixture.  Then, cover the dish with some aluminum foil and pop it in the oven.


It will bake for 40 minutes, then you pull it out and remove the aluminum foil.  Top it with the chopped pecan pieces, and then put it back in the oven, without the aluminum foil top.  You'll just bake it for another 10 minutes or so.  I baked mine a bit longer because I like it to the point that it is nicely browned.


So there you have it! Super simple and really really tasty.  It'd probably taste good as a side to anything, but I think it'd be best with a lighter meat like pork or chicken.  Hopefully you'll like it as much as I do!

Enjoy!
Jenn

Wednesday, December 14, 2011

Paleo Stuffed Pork Loin - Harvest Style

Normally, I'm not a fan of pork.  I feel like it tends to get really dry or not flavorful.  Recently, though, I've been making more pork recipes.  There are a lot of recipes that look really good, but use bread as a stuffing... corn bread, brioche bread, even wheat bread.... blah to bread!  I needed to find something else to add some body to the stuffing.  This is one concoction that I just kinda threw together.  I had made pork loin a few weeks ago stuffed with raisins and apples and it was surprisingly good.  This week, I decided to try it again, but this time, with different "stuffing" things.  I had some dried apricots and figured that I could find a few things to complement the flavor... and I did!

Paleo Harvest Stuffed Pork Loin


* 3 lb boneless pork loin roast
* 1/2 cup of dried apricots (no sugar added)
* 1/4 cup of natural apple cider (apples should be the only ingredient!)
* 1/4 cup of chopped pecans
* 3 cloves of garlic
* 1/2 tbs rosemary
* 1 tsp bacon fat/butter/etc


First, I tried to cut the pork so that it would lay flat.  I'd done it before where you go in a circle and get 1 nice long, flat piece of pork.  This time,  I didn't have the patience and just cut the whole thing down the middle to butterfly it.  I also seasoned the whole thing with some salt and pepper.

 I chopped the garlic and added it to a saute pan with some of the bacon grease and the rosemary.  I let it cook for a little bit to get a bit of the sharpness out of the flavors.  I wanted them to mellow out and just taste really good together.  I also used dried rosemary, so I didn't want the little leaves to be all spiky and stuff.


While the garlic and rosemary were cooking, I chopped up the apricots into nice little bite sized pieces.  I hate it when you bit into something and this HUGE chunk comes out.  So, anyway, I cut them up and threw them into the pan to warm through.


After that, I added in the apple cider.  I'm not sure why I added it in there.  I just had some in the fridge and thought, what the heck, why not?!  So anyway, it did help to soften up the apricots and the pecans.  It also helped all of the flavors to really blend together.   I cooked it all, stirring continuously, until most of the apple cider had evaporated or had soaked into the other ingredients.  I then took it off the stove and let it cool until it was a good temperature for me to handle it.


I then placed all of the stuffing  in the middle of the pork loin.  I wanted to make sure it was spread evenly so that there was a lot of flavor in every bite.  No one wants to be stuck with that one end piece that doesn't have anything fun in it, right?!


Then, I folded the pork back up into its original round shape and I tied it up with some kitchen twine (which I have since misplaced and have gone CRAZY tearing up the kitchen looking for it!!!).  There are videos on youtube on how to tie up a roast.  Really, any way you can get it to stay together is good!  You really just don't want to throw it in the oven and have it open up so the stuffing can spill everywhere.  The stuffing adds so much flavor and makes it tender. 
 I threw it into the oven at 375 for about 45 minutes.  You want to keep an eye on it because the last thing you want is to burn it!  They've recently said that you can eat pork medium now (you don't have to cook it well done throughout like you used to).  So really, just cook it to your desired amount of doneness.  Just make sure that you let the roast rest for about 10 minutes when it comes out of the oven.  You want to give it time for the juices to redistribute.  The last thing you want is to cut it immediately and have all of the yummy flavor to slip out... that will cause you to lose flavor and also make it more dry.


Here is the finished result! It was delicious!   I really liked it! I think the rosemary added a nice little kick to the sweetness of the apricots.  The pecans also added some good flavor!  This is a great dish which I will definitely be making again!


It's pictured here, served with a sweet potato and apple bake.  The recipe will be coming soon because it paired up sooooo well with the dish.  Of course, you can add any veggies that you like.  I tend to think of harvest flavors and orange veggies - squash, carrots, sweet potatoes.   Enjoy!

Thursday, November 24, 2011

Braised Short Ribs

Curt and I go to a local farm to buy fresh grass fed beef.  We don't have enough room in the freezer to buy a whole quarter of a cow, so we end up buying a share of a cow.  Basically, we get 2 grocery bags full of random cuts of meat.  In the last one, we got some short ribs!  To me, short ribs are perfect for cold weather!  Most recipes call for the same sort of ingredients, so here's a different rendition!

Braised Short Ribs with hidden veggies


* 4 lbs of short ribs
* 1 cup red wine
* 1 whole onion
* 1 small can of tomato paste
* 1 cup of carrots
* 1 cup of mushrooms
* 2 stalks of celery
* 2 cups of beef broth
* 5 cloves of garlic

First, I seasoned all sides of the short ribs with salt and pepper.  I heated up some bacon grease in a heavy bottomed pot and browned all sides of the short ribs.  I'm not totally sure of the science behind why you want to brown the meat before cooking it for a long time, but I know all of the professionals do it, so I did it too!

While the meat was browing, I started working on the veggies.  I had to shred the carrots and celery in the food processor.  Make sure the lid is on tight though!  I guess I didn't have mine closed all the way and carrots flew all over the place!  Kylie was just wishing it had rained short ribs, rather than carrots. haha


Here's a picture of the shredded carrots and celery.  I figured that the smaller they were shredded, the faster they would cook and really break down.  I thinly sliced the onion and garlic, but I did that by hand.

Once the short ribs were browned on all sides, I removed them from the pot and set them aside.  Then, I added in a little bit extra bacon grease.  Then, I added in the onions and garlic to let then start cooking.

Next, I added in the carrots and let everything start to cook through.


Next went in the tomato paste.  I just let everything get all combined while still on medium heat.

Next went in the red wine.  I kinda eyeballed it, but I think I used about 1 cup.

I stirred everything together until it looked somewhat like a veggie soup.  Then, I put the browned short ribs back into the pot.   I put the lid on and baked it in the oven at 400 for 1 hour.  Then, I lowered the temperature to 250 and let it bake for another 3 hours.  It probably would have worked in a slow cooker too, but I just felt like using my pretty new cast iron pot.  :)    Also, when cooking short ribs, I think I heard that they are better when they are cooked for a long time. 

When I took it out of the oven, I again removed the short ribs and set then aside.  I added in the mushrooms.  I didn't add them in the beginning because, well, I forgot they were in my fridge.  Then, I realized that I had them, so I chopped them up and threw them in the pot.  The heat from the soupy mixture cooked them through pretty quickly.


I did put the pot on medium heat to thicken up the sauce a bit.  Like I've said before, Curt wasn't a huge fan of veggies, so I wanted to puree everything so he couldn't pick the mushrooms and stuff out.  So out came my immersion blender.

I just blended everything for a few minutes so that it was just a nice yummy, super flavorful sauce.  I left it on the stove on medium to thicken up a bit while I shredded the short ribs.  They had cooled down enough for me to handle them a bit.  They had cooked for so long that the meat really just pulled apart easily.  I removed the bones and shredded the meat into fork sized pieces. 


Then, I added the shredded meat back to the sauce to warm up.  Then, it was ready to serve!

I  served mine over some mashed cauliflower.  It was a perfect little comfort food meal for me.  The dish had a lot of flavor, but few veggie chunks, which I'm sure that Curt loved. 

I'm definitely going to make this dish again! Curt liked it a lot too. I sent it with him for lunch, so I didn't really see much first hand reaction, but he ate it all, so I'm assuming he enjoyed it :)