Wednesday, December 28, 2011

Apple Sweet Potato Bake

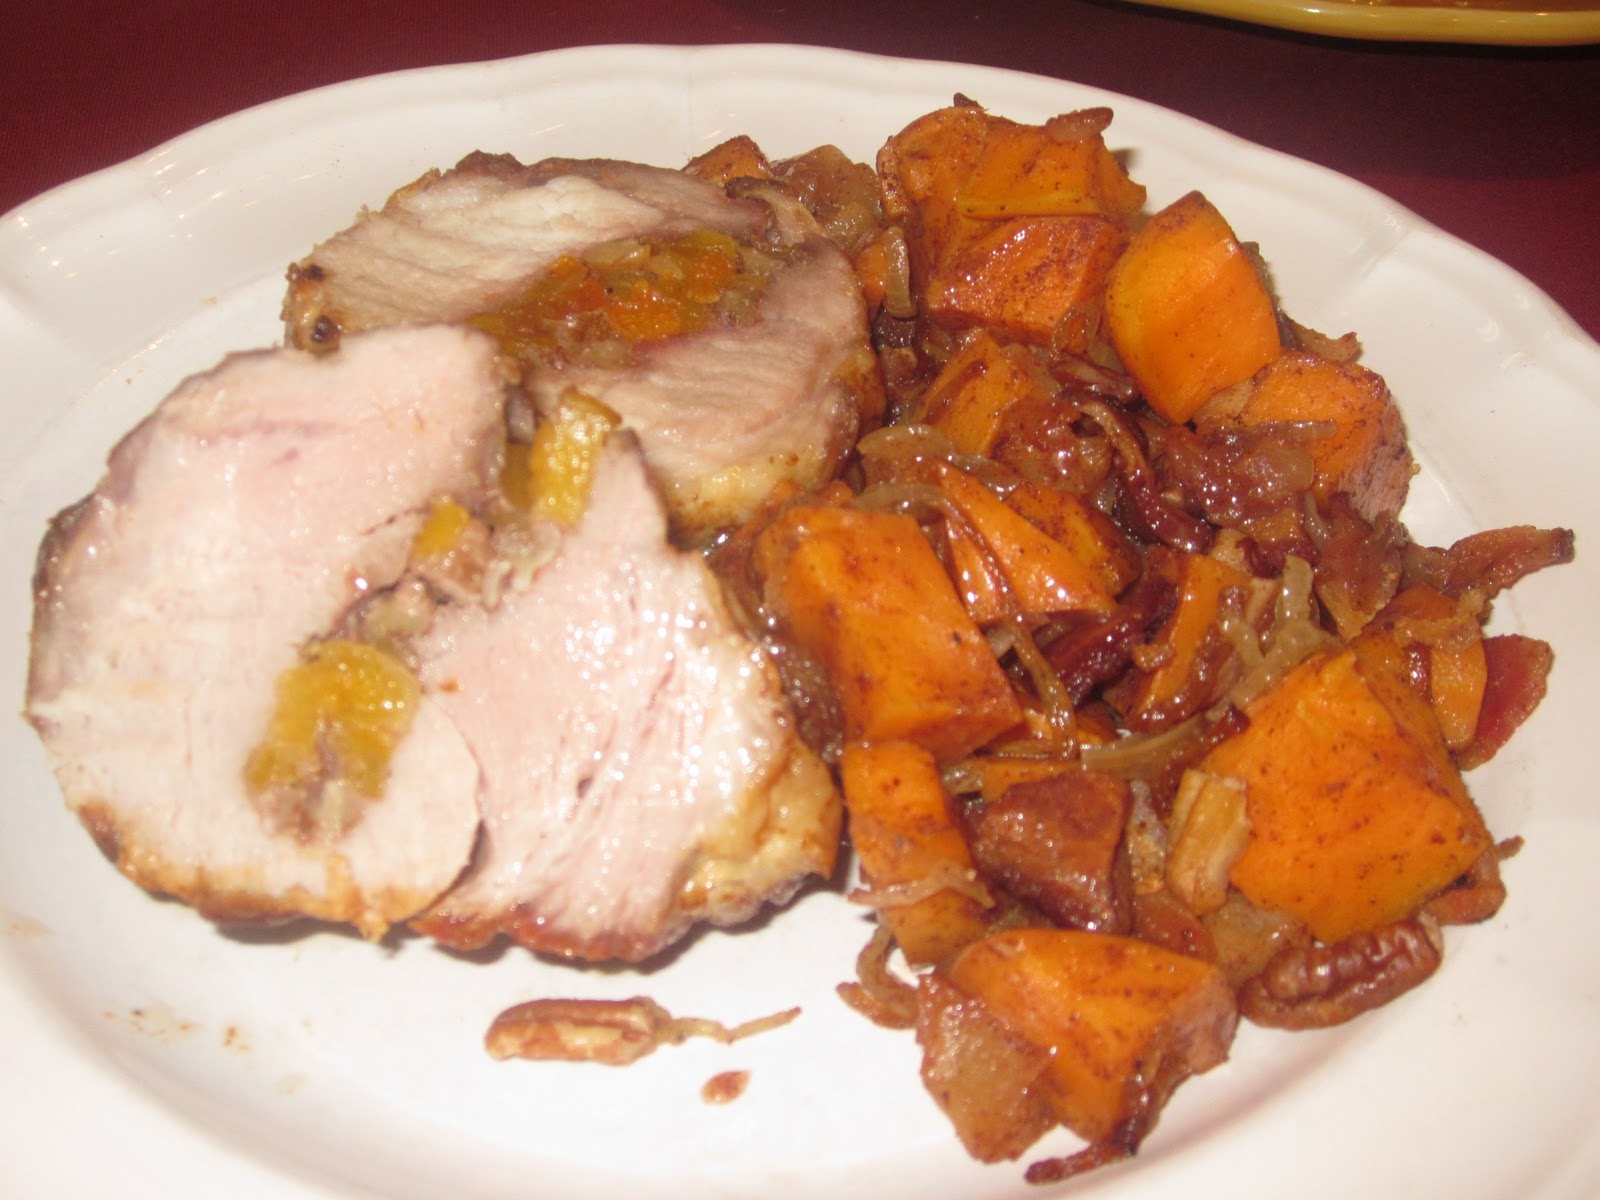
In my last posting, I made this yummy Stuffed Pork Roast.  I was surprised at how well it turned out!  I needed a side dish to go with it, so I pulled out this recipe.  When we were in Massachusetts over Thanksgiving, my mother in law had this Kraft magazine that had a bunch of recipes.  Many of them were FAR from paleo, but this one seemed promising.  By the time we had gotten back to Virginia, my sister in law, Tracee, had texted me saying that it was really good!  So here it is... with a few minor twists, of course!

Apple- Bacon Sweet Potato Bake


* 1 large onion, chopped
* 6 slices bacon, chopped
* 2 large sweet potatoes, peeled and cut into chunks
* 2 apples (I used Braeburn), peeled and chopped
* 1/2 cup apple cider (no sugar or anything added- just apples)
* 1 tsp. ground cinnamon
* 1/4 cup chopped pecans


This recipe was easy peasy.  First, preheat the oven to 350.  Then throw the chopped bacon into a pan on medium high heat and let it get nice and crispy.  Once it's crispy, turn the heat down to medium low and remove the bacon to a separate plate.  Keep the bacon fat in there because that's what you'll cook the onions in.  Make sure you let the fat cool down a bit because you don't want to fry the onions, just make them soft. So you throw the onions in there and cook until soft.  Then add the bacon back to the pan for another minute or two.


While all the bacon and onions were cooking, I took the time to chop up the apples and the sweet potatoes.  Then, in a baking dish, just throw the cubed sweet potatoes and the apples.  Mix them up so they are all combined nicely. 


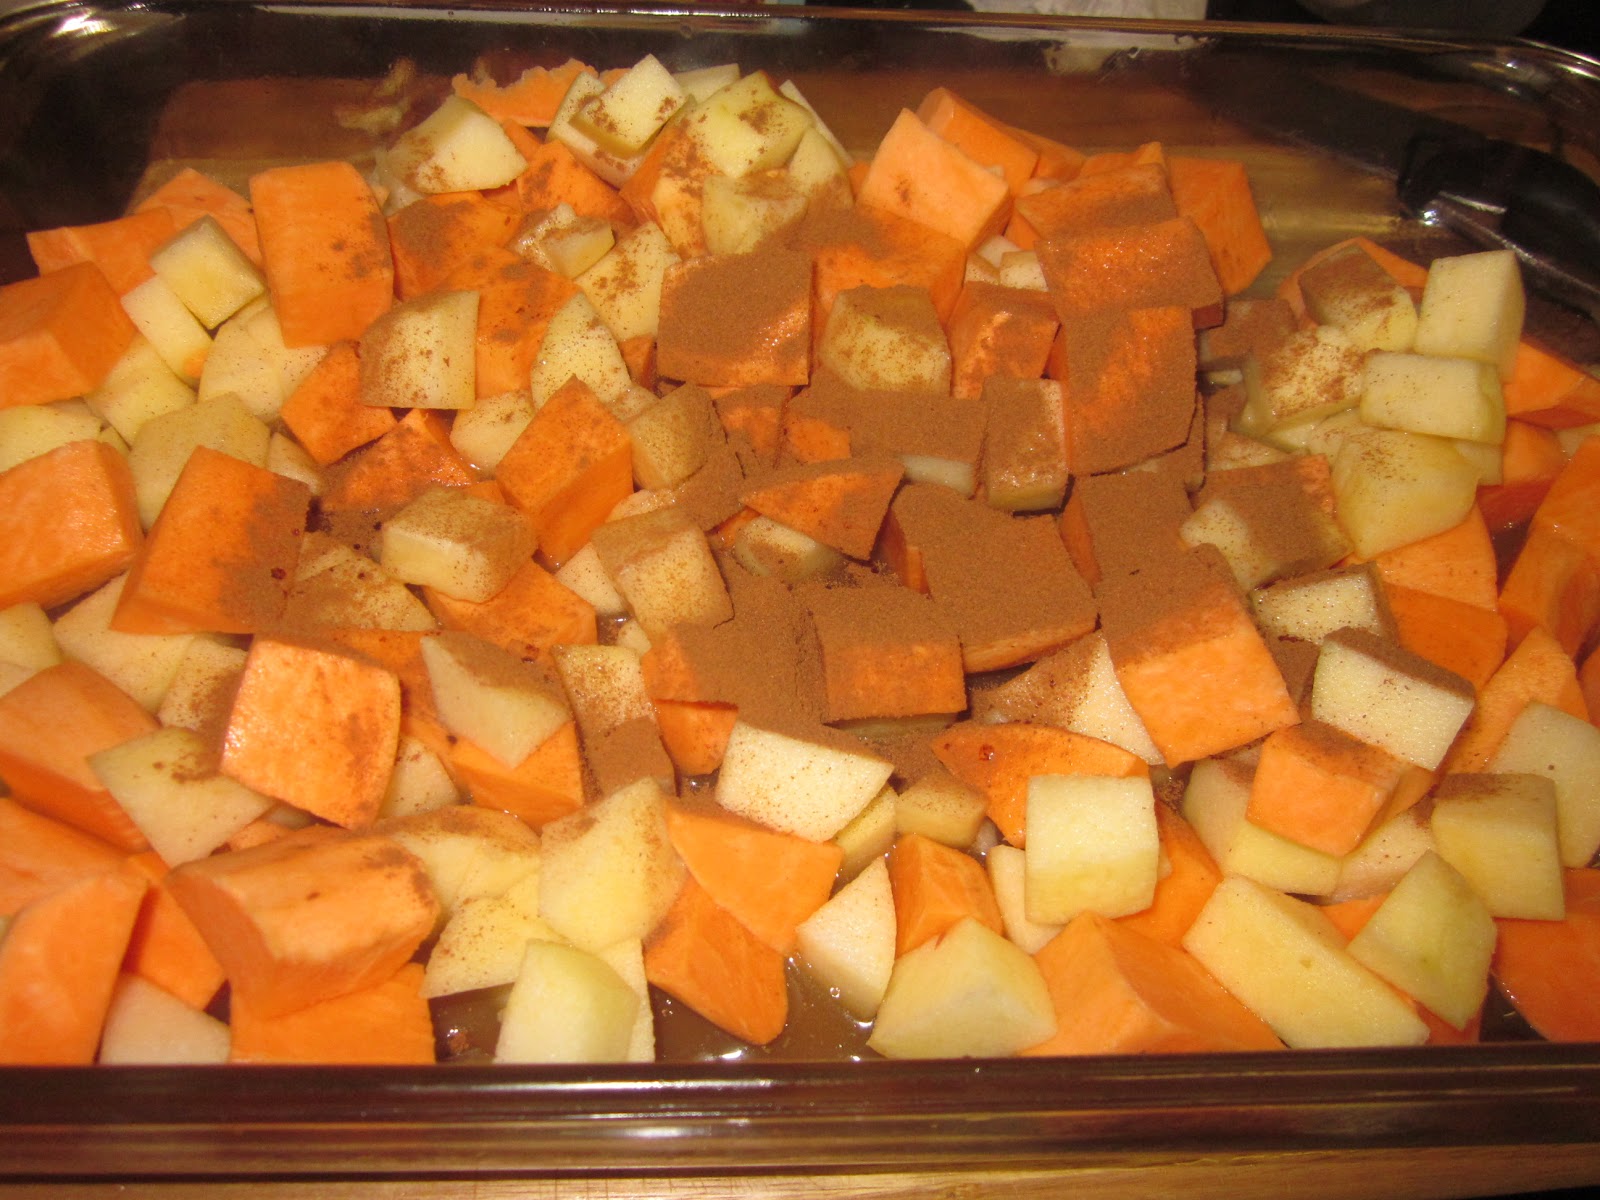
Next, you'll add in the apple cider and cinnamon.  Then, you'll mix everything up so it's evenly distributed.  You could use a spoon to make sure it's evenly distributed, but I think using your hands is easier and faster... and why dirty a spoon when you don't need to, right?


Next, pour the bacon and onion mixture over the sweet potato and apple mixture.  Then, cover the dish with some aluminum foil and pop it in the oven.


It will bake for 40 minutes, then you pull it out and remove the aluminum foil.  Top it with the chopped pecan pieces, and then put it back in the oven, without the aluminum foil top.  You'll just bake it for another 10 minutes or so.  I baked mine a bit longer because I like it to the point that it is nicely browned.


So there you have it! Super simple and really really tasty.  It'd probably taste good as a side to anything, but I think it'd be best with a lighter meat like pork or chicken.  Hopefully you'll like it as much as I do!

Enjoy!
Jenn

Wednesday, December 14, 2011

Paleo Stuffed Pork Loin - Harvest Style

Normally, I'm not a fan of pork.  I feel like it tends to get really dry or not flavorful.  Recently, though, I've been making more pork recipes.  There are a lot of recipes that look really good, but use bread as a stuffing... corn bread, brioche bread, even wheat bread.... blah to bread!  I needed to find something else to add some body to the stuffing.  This is one concoction that I just kinda threw together.  I had made pork loin a few weeks ago stuffed with raisins and apples and it was surprisingly good.  This week, I decided to try it again, but this time, with different "stuffing" things.  I had some dried apricots and figured that I could find a few things to complement the flavor... and I did!

Paleo Harvest Stuffed Pork Loin


* 3 lb boneless pork loin roast
* 1/2 cup of dried apricots (no sugar added)
* 1/4 cup of natural apple cider (apples should be the only ingredient!)
* 1/4 cup of chopped pecans
* 3 cloves of garlic
* 1/2 tbs rosemary
* 1 tsp bacon fat/butter/etc


First, I tried to cut the pork so that it would lay flat.  I'd done it before where you go in a circle and get 1 nice long, flat piece of pork.  This time,  I didn't have the patience and just cut the whole thing down the middle to butterfly it.  I also seasoned the whole thing with some salt and pepper.

 I chopped the garlic and added it to a saute pan with some of the bacon grease and the rosemary.  I let it cook for a little bit to get a bit of the sharpness out of the flavors.  I wanted them to mellow out and just taste really good together.  I also used dried rosemary, so I didn't want the little leaves to be all spiky and stuff.


While the garlic and rosemary were cooking, I chopped up the apricots into nice little bite sized pieces.  I hate it when you bit into something and this HUGE chunk comes out.  So, anyway, I cut them up and threw them into the pan to warm through.


After that, I added in the apple cider.  I'm not sure why I added it in there.  I just had some in the fridge and thought, what the heck, why not?!  So anyway, it did help to soften up the apricots and the pecans.  It also helped all of the flavors to really blend together.   I cooked it all, stirring continuously, until most of the apple cider had evaporated or had soaked into the other ingredients.  I then took it off the stove and let it cool until it was a good temperature for me to handle it.


I then placed all of the stuffing  in the middle of the pork loin.  I wanted to make sure it was spread evenly so that there was a lot of flavor in every bite.  No one wants to be stuck with that one end piece that doesn't have anything fun in it, right?!


Then, I folded the pork back up into its original round shape and I tied it up with some kitchen twine (which I have since misplaced and have gone CRAZY tearing up the kitchen looking for it!!!).  There are videos on youtube on how to tie up a roast.  Really, any way you can get it to stay together is good!  You really just don't want to throw it in the oven and have it open up so the stuffing can spill everywhere.  The stuffing adds so much flavor and makes it tender. 
 I threw it into the oven at 375 for about 45 minutes.  You want to keep an eye on it because the last thing you want is to burn it!  They've recently said that you can eat pork medium now (you don't have to cook it well done throughout like you used to).  So really, just cook it to your desired amount of doneness.  Just make sure that you let the roast rest for about 10 minutes when it comes out of the oven.  You want to give it time for the juices to redistribute.  The last thing you want is to cut it immediately and have all of the yummy flavor to slip out... that will cause you to lose flavor and also make it more dry.


Here is the finished result! It was delicious!   I really liked it! I think the rosemary added a nice little kick to the sweetness of the apricots.  The pecans also added some good flavor!  This is a great dish which I will definitely be making again!


It's pictured here, served with a sweet potato and apple bake.  The recipe will be coming soon because it paired up sooooo well with the dish.  Of course, you can add any veggies that you like.  I tend to think of harvest flavors and orange veggies - squash, carrots, sweet potatoes.   Enjoy!

Thursday, November 24, 2011

Braised Short Ribs

Curt and I go to a local farm to buy fresh grass fed beef.  We don't have enough room in the freezer to buy a whole quarter of a cow, so we end up buying a share of a cow.  Basically, we get 2 grocery bags full of random cuts of meat.  In the last one, we got some short ribs!  To me, short ribs are perfect for cold weather!  Most recipes call for the same sort of ingredients, so here's a different rendition!

Braised Short Ribs with hidden veggies


* 4 lbs of short ribs
* 1 cup red wine
* 1 whole onion
* 1 small can of tomato paste
* 1 cup of carrots
* 1 cup of mushrooms
* 2 stalks of celery
* 2 cups of beef broth
* 5 cloves of garlic

First, I seasoned all sides of the short ribs with salt and pepper.  I heated up some bacon grease in a heavy bottomed pot and browned all sides of the short ribs.  I'm not totally sure of the science behind why you want to brown the meat before cooking it for a long time, but I know all of the professionals do it, so I did it too!

While the meat was browing, I started working on the veggies.  I had to shred the carrots and celery in the food processor.  Make sure the lid is on tight though!  I guess I didn't have mine closed all the way and carrots flew all over the place!  Kylie was just wishing it had rained short ribs, rather than carrots. haha


Here's a picture of the shredded carrots and celery.  I figured that the smaller they were shredded, the faster they would cook and really break down.  I thinly sliced the onion and garlic, but I did that by hand.

Once the short ribs were browned on all sides, I removed them from the pot and set them aside.  Then, I added in a little bit extra bacon grease.  Then, I added in the onions and garlic to let then start cooking.

Next, I added in the carrots and let everything start to cook through.


Next went in the tomato paste.  I just let everything get all combined while still on medium heat.

Next went in the red wine.  I kinda eyeballed it, but I think I used about 1 cup.

I stirred everything together until it looked somewhat like a veggie soup.  Then, I put the browned short ribs back into the pot.   I put the lid on and baked it in the oven at 400 for 1 hour.  Then, I lowered the temperature to 250 and let it bake for another 3 hours.  It probably would have worked in a slow cooker too, but I just felt like using my pretty new cast iron pot.  :)    Also, when cooking short ribs, I think I heard that they are better when they are cooked for a long time. 

When I took it out of the oven, I again removed the short ribs and set then aside.  I added in the mushrooms.  I didn't add them in the beginning because, well, I forgot they were in my fridge.  Then, I realized that I had them, so I chopped them up and threw them in the pot.  The heat from the soupy mixture cooked them through pretty quickly.


I did put the pot on medium heat to thicken up the sauce a bit.  Like I've said before, Curt wasn't a huge fan of veggies, so I wanted to puree everything so he couldn't pick the mushrooms and stuff out.  So out came my immersion blender.

I just blended everything for a few minutes so that it was just a nice yummy, super flavorful sauce.  I left it on the stove on medium to thicken up a bit while I shredded the short ribs.  They had cooled down enough for me to handle them a bit.  They had cooked for so long that the meat really just pulled apart easily.  I removed the bones and shredded the meat into fork sized pieces. 


Then, I added the shredded meat back to the sauce to warm up.  Then, it was ready to serve!

I  served mine over some mashed cauliflower.  It was a perfect little comfort food meal for me.  The dish had a lot of flavor, but few veggie chunks, which I'm sure that Curt loved. 

I'm definitely going to make this dish again! Curt liked it a lot too. I sent it with him for lunch, so I didn't really see much first hand reaction, but he ate it all, so I'm assuming he enjoyed it :)

Wednesday, November 2, 2011

Fantastically Foolproof Fish

Soooo it's been FOREVER since I've made a posting.  Things have been crazy around here with school lesson plans to write, my own grad school research projects to complete, and housing renovations in the works.  Sadly, that meant that my poor little blog has been left on the back burner.... Hopefully, I'll be able to keep up with postings so I can share all of the yummy recipes I've been trying out!

Sometimes you want a simple and yummy meal.  I was watching the food channel and they were making fish en papillote.  This seemed pretty easy and I needed a fast dinner for me and the hubby.  This is a really simple, healthy, and tasty dish that you should definitely try!

Fish en Papillote


* 1 zucchini
* 1/2 red bell pepper
* 1/4 red onion
* 2 cloves minced garlic
* 1 cup sliced button mushrooms
* 2 sole fillets
* 2 tbs grass fed butter
* 2 lemon slices
* 1 tbs white wine
* 1 tsp thyme (fresh is best)


The first thing I did was to julienne all of the vegetables.  I don't know that this is a necessary step, but I think that all of the vegetables cook better and more evenly when they are the same size. 

I will say that when I did this, I had put all of the vegetables in when they were all raw.  When it was finished, the onions were still pretty raw since they take a bit longer to cook through.  There was just a lot of bite to the onion in the dish.  I recommend slightly sauteeing the onions first or else cut them REALLY thin. 


I threw all of the veggies into a bowl and tossed them with the thyme, then added a bit of salt and pepper.


I cut 2 pieces of aluminum foil to a size that would be enough to fold some of the foil over the fish.  I put 1 piece of fish on each piece of foil.

Then, I covered each fillet of fish completely with the veggies.  I like having a lot of veggies with my meal, so, as you can see, the veggies totally cover the fish.  I put a lemon slice and a little bit more of the thyme on the very top.  

Then, I added in a little dollop of butter and 1/2 tbs of the white wine to each packet, just to give it a little extra flavor.


After everything was assembled, I rolled the foil down and sealed it so that all of the steam from the wine, fish, and lemon juice would get trapped and give some extra flavor to the fish.  Don't these look like giant Chipotle burritos? haha


I had the oven preheated to 375, and threw the fish packets in for only about 12 minutes.  The fish is very thin, so it doesn't take long to cook through at all.  One nice thing is that you don't have to worry about overcooking the fish.  Obviously, you don't want to keep it in the oven for too long, but since its basically steaming, it's hard to really mess up!  Thus my title Foolproof Fish!

I let the fish packets sit for a few minutes just to cool down a bit.  If you open the packets right after you take them out of the oven, you could end up with a pretty bad steam burn!
 

So here's the fish in a dish for you to eat when you wish ( sorry, I teach elementary school and every once in a while, the Dr. Seuss has to come out!)  Anyway, the fish was really, really good! It was so incredibly simple (you can even buy frozen julienned veggies to help make your job even easier!).  It had a nice flavor, it was very good! 

Like I mentioned above, the only thing that I wasn't a huge fan of was the fact that the veggies and fish were all cooked, but the onions were still a little bit raw, giving the whole thing a bite.  I love onions, but I think that when you have such a tender fish, the flavors all have to be pretty light. 

Overall, I'm totally making this dish again.  It was easy, cheap (sole isn't expensive at all), and it was fast!

Enjoy!

Friday, August 19, 2011

Local Gold Mines

Growing up, I remember going to farmers markets with my mom and sister.  I didn't really understand why we went to a farmer's market when we could just go to the grocery store and get the same food.  Now, I really appreciate and LOVE going to farmer's markets.  There are so many in the Northern Va area, so pretty much any day, I can find a market close by! Just look at some of the stalls and the beautiful displays of fruit and veggies!  One thing I love about farmers markets is that the food is local.  We don't always think about the fact that sometimes, our organic watermelon was grown on a completely different continent and probably cost a LOT of money to ship it here.  Then, there's also the fact that there was probably a lot of pollution created by having the food shipped so far away.


Another thing I love about farmer's markets is that a lot of the time, the farmers are right there!  You can ask them all sorts of questions.  I've asked them if they are organic or if they use chemicals... I've asked where they are located... I've asked what type of vegetable I'm holding... I've even asked what I could cook with a certain vegetable.  Most of the time, the farmers love answering questions and having the opportunities to brag a bit about their products.


Also, sometimes, local markets have other goods besides just fruits and vegetables.  This market had a beautiful and large selection of flowers!  The prices were very good and the arrangements were really big.  A lot of markets have local ranchers too.  I'm not sure what the difference is between a farmer or a rancher, but I always thought a farmer grows veggies and fruit and a rancher grows animals... so that's the context I'm going to use here.


I actually get my grass fed beef, pork, and chicken eggs from a local place called Chicama Run Farms.  They raise everything themselves and everything is hormone free, chemical free, and free range!  Their products are delicious and they sell products at their farm or at the farmers markets they attend.  The quality is amazing, the prices are great, and the taste is wonderful.  The eggs they sell have deeper yellow yolks and their shells are browns, whites, and soft tans.  Also, they are guaranteed to be laid by their free range hens that week, so they stay good for 60 days!  Which leads me to my next point...


Food that you get from a farmer's market usually stays fresh for longer!  I hate it when I buy some veggies from a grocery store, then 2 days later when I want to use them, they have gone bad!  Doesn't that suck?! If you think about it, when you pick up veggies from a farmer's market, they have been picked recently and brought to market on a truck that day!  Then compare that to veggies that may have been grown in a different state, picked then put on a truck to a distributing center, then taken on a different truck from that distributing center to another store, then maybe it sat in the back for a day, then displayed, then sat there for a day when you pick it out and take it home.  It's easy to see that farmer's markets are more fresh! 


Farmer's markets also offer opportunities to try new things!  Did you know that there are several different types of avocados?  This nice guy actually cut up 2 different types of avocados, Reed and Haas.  Then he told me I had to try them both and taste the difference.  The Reed were very sweet - perfect to put on a salad or eat lightly dressed.  The Haas were what I am used to.  They were very good too, but I definitely noticed a very distinct difference!  You learn something new every day!


Look at all the vendors that lined the street!  There were even people selling hand crocheted blankets and goat cheese (made by the guy who was at the booth - he milks the goats 2 times a day! - delicious!!!!)  Then there are also those people who sell cookie and breads and other glutinous stuff that I stayed away from... mainly because of the gluten, but also because there was a kinda creepy guy that was trying to flirt with me >yuck<


One last picture- look at those artichokes! I didn't know that they had flowers to them!  According to the farmer, you cut the flower off, boil it in water, then strain it and drink it as a tea... I think I might stick with my favorite mint tea personally... but at least now if I'm ever on one of those extreme cooking show where I get a flowered artichoke, I know what to do!


So... there you have it!  The best local gold mines ever - farmer's markets.  If you haven't checked one out, you definitely should.  I think the ones on Saturdays tend to have a bit more vendors at them, but you never know! 

If you don't know of any near you, just google your city or county and then farmer's markets. 

Good luck and enjoy!

Wednesday, August 10, 2011

Roasted Poblano Vinaigrette

I've never really been a salad person.  I was never one of those girls who, on a date, would eat a big bowl of lettuce and miraculously claim that "Wow, I'm stuffed!"  When I went out, I was more of a ribeye and asparagus girl.  However, since going paleo, I've had a new appreciation for salads! 

One of the problems was that I used to count calories (I know! pointless! but that was my pre-paleo days).  Anyway, for me to like a salad, I needed to add so many toppings (cheese, croutons, spiced pecans, those toasted noodle thingeys).  After all of those things were added, the calories were totally not worth it!  Now, I've realized that I CAN eat a whole bowl of lettuce and throw on all sorts of toppings (paleo friendly of course!)   Now that I can be creative and not have to worry about pointless calorie counting, I've started to actually like salads!  With this in mind, here's a paleo friendly salad dressing in case you want a change from the old oil and vinegar :)

Roasted Poblano Vinaigrette
(Bobby Flay's recipe!)


  • 2 poblano pepers, roasted, peeled and seeded
  • 1/4 cup chopped red onion
  • 3 tablespoons fresh lime juice
  • 3/4 cup olive oil
  • 1/2 cup spinach leaves
  • 1 teaspoon honey (optional)
  • Salt and freshly ground pepper 


I've seen people roast poblanos and other peppers before, but I'd never  actually done it before.  The other day when I was grilling up these babies  I just threw on the fresh poblanos that I bought from a local farmer's market.  You just throw them on the grill and let the outside char... they will look like you burned them to a crisp, but it's ok... it's just the skin that's black, the inside is nice and roasty and yummy.  Anyway, you throw the peppers on the fire and let them get nice and black.  Afterwards, throw them in a ziplock bag because this helps the peppers to steam and the skin to loosen.  Then, you can scrape off the skin, then remove the stem and cut the seeds out. Then you'll have peppers that look like the picture above.


While I was letting the peppers steam, I juiced the limes... I think it took 2 small limes to get the right amount of juice.  For this recipe, you definitely want to use fresh juice.  The stuff that you can buy from concentrate never tastes the same, and especially since we aren't cooking this recipe, you'd really be able to taste the freshness!


Next, I pulled out my trusty mini food processor and threw in the 1/4 of the onion (Bobby used red, but I only had a white onion, so that went in).  I also put in the garlic, honey, and the roasted poblanos. Then, I whirled it all together until everything was about the same consistency.


It will all look like this when it's pureed to the right consistency.  Doesn't look much like salad dressing yet, but just wait!


Next, you'll want to stream in VERY SLOWLY the olive oil.  This little food processor had 2 tiny little holes in the top of the lid, so I slowly poured the olive oil in.  You have to do it slowly so the salad dressing can get to the right texture.... it's called emulsification.  I'm not 100% sure of the science behind it, but I know that it won't turn out right if you don't do it!


Next, you want to add in the spinach leaves.  I'm not sure why this was a part of the recipe... maybe to give it more green color?   Either way, I followed the recipe and I thought it worked out :)


So you puree it again until everything is pureed until its nice and smooth.  Basically, you don't want big chunks of garlic or spinach in your dressing - at least I didn't, but if you do, then just go for it!


So here's the dressing on a steak salad.  It's just some greens with sliced steak and the vinaigrette.  I typically put more stuff in my salads (onion, carrots, peppers, etc) but this one was for Curt and he likes just lettuce and meat haha. 

Overall, I thought this was a great recipe! It was easy and made about 1 1/2 or 2 cups.  I saved it in this little mason jar and stuck it in the fridge for the rest of the week.  It would go well with a spicy meal... like fajitas or tacos or something else similarly delicious!!


Enjoy!!